|
Size: 6518
Comment:
|
Size: 6760
Comment:
|
| Deletions are marked like this. | Additions are marked like this. |
| Line 19: | Line 19: |
| {{{ | |
| Line 20: | Line 21: |
| }}} | |
| Line 23: | Line 24: |
| > pointFoc.py -h | {{{ > pointFoc.py -h }}} |
| Line 28: | Line 31: |
| > python pointFoc.py | {{{ > python pointFoc.py }}} |
| Line 42: | Line 47: |
| a) all scans between two dates \\ b) one specific project c) one specific project between two dates. Input variables are: -s, --start : reads in Start Date -e, --end : reads in End Date -p, --project : reads in Project Name -o, --output : reads file name to save the Plot -f, --Format : sets the graphic format (eps, png, pdf) -h, --help : print this help The format for dates need to be 'Year-Month-Day', e.g. '2012-01-06' optionally a time can be also given by 'Year-Month-Day Hour:Minute:Second', e.g. '2012-01-06 21:56:45'; with a space in between the Date and the Time. Projects names are the 30m names, e.g. '105-09' or 'monitoring' etc.. For a) give only start and end dates for b) only Project Name for c) all three parameters. A plot of all pointings and focus values of the last week is the Default if nothing is specified. The default output file is 'plPoiFoc.eps' in eps format. Via -o and -f name and format can be changed respectively. Possible formats are png, eps, pdf, jpg. Usage Examples: (on mrt-lx3 skip python before the script name) Case a) python pointFoc.py -s '2012-01-06' -e '2012-01-16' Case b) python pointFoc.py -p '145-11' Case c) python pointFoc.py -s '2012-01-06' -e '2012-01-16' -p '145-11' Change plot name and format: python pointFoc.py -p '145-11' -o 'newName.png' -f 'png' |
a) all scans between two dates<<BR>> b) one specific project<<BR>> c) one specific project between two dates.<<BR>> Input variables are:<<BR>> -s, --start : reads in Start Date<<BR>> -e, --end : reads in End Date<<BR>> -p, --project : reads in Project Name<<BR>> -o, --output : reads file name to save the Plot<<BR>> -f, --Format : sets the graphic format (eps, png, pdf)<<BR>> -h, --help : print this help<<BR>> The format for dates need to be 'Year-Month-Day', e.g. '2012-01-06'<<BR>> optionally a time can be also given by 'Year-Month-Day Hour:Minute:Second',<<BR>> e.g. '2012-01-06 21:56:45'; with a space in between the Date and the Time.<<BR>> Projects names are the 30m names, e.g. '105-09' or 'monitoring' etc..<<BR>> For a) give only start and end dates<<BR>> for b) only Project Name<<BR>> for c) all three parameters.<<BR>> A plot of all pointings and focus values of the <<BR>> last week is the Default if nothing is specified.<<BR>> The default output file is 'plPoiFoc.eps' in eps format. <<BR>> Via -o and -f name and format can be changed respectively. <<BR>> Possible formats are png, eps, pdf, jpg. <<BR>> Usage Examples: <<BR>> (on mrt-lx3 skip python before the script name)<<BR>> Case a): {{{ > python pointFoc.py -s '2012-01-06' -e '2012-01-16' }}} Case b): {{{ > python pointFoc.py -p '145-11' }}} Case c) {{{ > python pointFoc.py -s '2012-01-06' -e '2012-01-16' -p '145-11' }}} Change plot name/path and format:<<BR>> {{{{ > python pointFoc.py -p '145-11' -o 'newName.png' -f 'png' }}} |
How To create the Pointing Plot
Contents
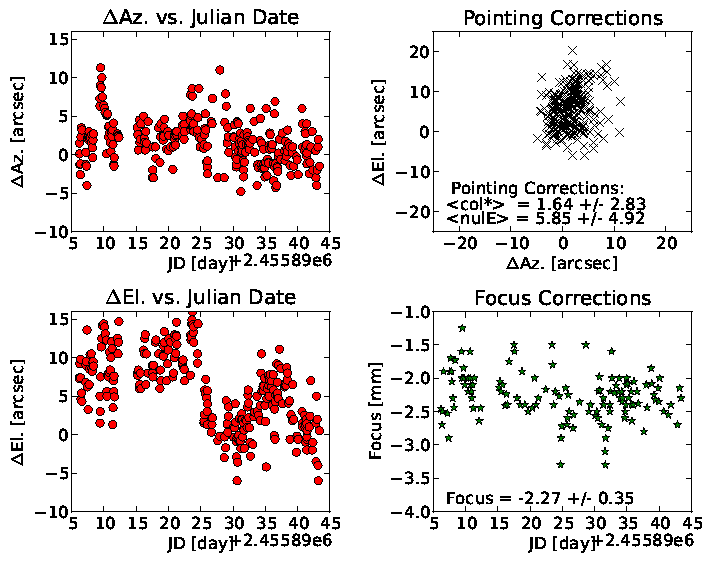
Example Plot

NEW SQL powered version of the script
The pointFoc.py script now accses the Tapas database directly via a MySQL search. Now all used pointing corrections between two dates, for one project, or one project between two dates can be display with one command. Please refer to the Usage instructions below.
On mrt-lx3 the script is available systemwide for all users via:
> pointFoc.py
For help see
> pointFoc.py -h
If you want to use the script on other machines, please download the up-to-date version as instructed below. Using the script on your machine the command is:
> python pointFoc.py
You have to have: matplotlib, numpy, MySQLdb and getpass installed on your machine.
Important
Since the script accsesses Tapas directly it is secured with a password, which is the same as for the iramstaff account of the Tapas database.
Usage Instructions
This script creates a plot of the 30m pointing and focus used for observations for:
a) all scans between two dates
b) one specific project
c) one specific project between two dates.
Input variables are:
-s, --start : reads in Start Date
-e, --end : reads in End Date
-p, --project : reads in Project Name
-o, --output : reads file name to save the Plot
-f, --Format : sets the graphic format (eps, png, pdf)
-h, --help : print this help
The format for dates need to be 'Year-Month-Day', e.g. '2012-01-06'
optionally a time can be also given by 'Year-Month-Day Hour:Minute:Second',
e.g. '2012-01-06 21:56:45'; with a space in between the Date and the Time.
Projects names are the 30m names, e.g. '105-09' or 'monitoring' etc..
For a) give only start and end dates
for b) only Project Name
for c) all three parameters.
A plot of all pointings and focus values of the
last week is the Default if nothing is specified.
The default output file is 'plPoiFoc.eps' in eps format.
Via -o and -f name and format can be changed respectively.
Possible formats are png, eps, pdf, jpg.
Usage Examples:
(on mrt-lx3 skip python before the script name)
Case a):
> python pointFoc.py -s '2012-01-06' -e '2012-01-16'
Case b):
> python pointFoc.py -p '145-11'
Case c)
> python pointFoc.py -s '2012-01-06' -e '2012-01-16' -p '145-11'
Change plot name/path and format:
